A horizontal calendar can also be used in web development to display events, appointments, or tasks in a structured and organized manner. This type of calendar displays the days of the week and the dates in a row format, with the events or tasks for each day listed to the right of the corresponding date.
Here are some ways in which a horizontal calendar can be used in web development:
- Date selection: A horizontal calendar can be used for date selection, where users can easily choose a specific date or range of dates.
- Schedule overview: A horizontal calendar can be used to provide an overview of a user’s schedule, where they can see all their appointments or events in one place.
- Booking and reservations: A horizontal calendar can be used for booking and reservations, where users can see the availability of a resource or service over a period of time and book accordingly.
- Social media scheduling: A horizontal calendar can be used for social media scheduling, where users can plan and schedule their social media posts and see an overview of their posting schedule.
- Project management: A horizontal calendar can be used for project management, where users can see important milestones, deadlines, and events related to a specific project.
Overall, a horizontal calendar can be a useful tool in web development for displaying information in a clear and organized manner, and for improving user experience by making it easier to manage appointments, tasks, events, and schedules. The choice of a vertical or horizontal calendar depends on the specific use case and the design of the website or application.
Here’s a basic HTML boilerplate code that you can use as a starting point for your HTML project:
<!DOCTYPE html>
<html lang="en">
<head>
    <meta charset="UTF-8">
    <meta name="viewport" content="width=device-width, initial-scale=1.0">
    <title>My Website</title>
    <link rel="stylesheet" href="style.css">
</head>
<body>

    <script src="script.js"></script>
</body>
</html>
This boilerplate includes the following elements:
- The
<!DOCTYPE html>declaration, which tells the browser that this is an HTML document. - The
<html>element, which is the root element of the HTML document. - The
<head>element, which contains meta information about the document, such as the character set and the title of the page. - The
<body>element, which contains the visible content of the page. - A link to a CSS file and a script file, where you can add your own styles and scripts.
Add the following code into body tag
<ul class="week">
       <li>Mon</li>
       <li>Tue</li>
       <li>Wed</li>
       <li>Thu</li>
       <li>Fri</li>
       <li>Sat</li>
       <li>Sun</li>
   </ul>
The HTML code you provided is an unordered list (<ul>) that has a class attribute with the value “week”. This class can be used to style the list using CSS.
Within the list, there are seven list items (<li>), each representing a day of the week, starting with Monday (<li>Mon</li>) and ending with Sunday (<li>Sun</li>).
Unordered lists are commonly used in HTML to display a group of related items in a bulleted list. They are created using the <ul> element, and each list item is represented using the <li> element.
In this particular case, the list is being used to display the days of the week in a structured manner, which could be useful for creating a calendar or scheduling application. The use of the class attribute allows developers to target this particular list with CSS and apply styles specific to this list, without affecting other lists on the page.
Overall, this code represents a simple and effective way to display a list of days of the week using HTML.
Add following code in head tag.
<link href="https://fonts.googleapis.com/css2?family=Poppins:ital,wght@0,100;0,200;0,300;0,500;0,600;0,700;1,400;1,500;1,600&family=Raleway&display=swap" rel="stylesheet">
The HTML code you provided is a link to a Google Fonts stylesheet that contains the font families “Poppins” and “Raleway”.
Google Fonts is a web font service provided by Google that allows web developers to use a wide variety of fonts in their projects, without having to worry about compatibility issues across different devices and browsers.
The link element (<link>) is used to link to an external resource, in this case, the Google Fonts stylesheet. The “href” attribute specifies the URL of the resource being linked to, and the “rel” attribute specifies the relationship between the current document and the resource being linked to.
The stylesheet itself contains a list of font families that can be used in the web page. In this case, there are two font families listed: “Poppins” and “Raleway”. Each family includes different variations or weights of the font, which can be selected using CSS.
The “display=swap” parameter in the URL tells the browser to use a font swap technique that improves the performance of web pages by avoiding a flash of invisible text (FOIT) when custom fonts are loaded. This ensures that the page remains readable even while the fonts are being loaded.
Overall, the use of Google Fonts is a convenient way to add custom fonts to web pages and improve the typography and overall design of a website.
Now open css file and add following code
*{
            margin: 0;
            padding: 0;
            box-sizing: border-box;
            font-family: 'Poppins', sans-serif;
        }
It is a universal selector (*) that sets some common styles for all elements in the HTML document. Here’s a breakdown of each property:
margin: 0: This sets the margin of all elements to zero. Margin is the space between the element and the next element, and this property removes any default margin that might be added by the browser.padding: 0: This sets the padding of all elements to zero. Padding is the space between the content of the element and its border, and this property removes any default padding that might be added by the browser.box-sizing: border-box: This sets thebox-sizingproperty of all elements toborder-box. Theborder-boxvalue tells the browser to include the padding and border of an element in its total width and height, instead of adding it on top of the specified width and height. This makes it easier to calculate the size of an element and ensures that it behaves predictably when its size is changed.font-family: 'Poppins', sans-serif;: This sets the font family of all elements to “Poppins”, which is a custom font loaded from Google Fonts using the<link>tag we discussed earlier. If the font is not available, the browser will fall back to a sans-serif font.
By setting these styles on all elements in the HTML document, this CSS code ensures that there is a consistent and predictable layout and typography across the entire website.
body{
           display: flex;
           justify-content: center;
           align-items: center;
           min-height: 100vh;
           background: #222327;
       }
The CSS code sets styles for the <body> element of the HTML document. Here’s a breakdown of each property:
display: flex;: This sets the display property of the<body>element toflex, which turns the element into a flex container. This allows you to use flexbox layout to control the positioning and sizing of child elements.justify-content: center;: This aligns the contents of the flex container along the horizontal axis to the center. In this case, any child elements of the<body>element will be horizontally centered within the container.align-items: center;: This aligns the contents of the flex container along the vertical axis to the center. In this case, any child elements of the<body>element will be vertically centered within the container.min-height: 100vh;: This sets the minimum height of the<body>element to 100 viewport height units (vh), which means it will always take up at least the full height of the viewport. This ensures that the background color is visible across the entire viewport, even if the content of the page is shorter than the viewport height.background: #222327;: This sets the background color of the<body>element to a dark gray color (#222327). This provides a visually appealing background for the content of the web page.
Overall, this CSS code sets up a flexible container that centers its child elements both horizontally and vertically on the page, with a dark gray background that takes up at least the full height of the viewport. This is a common approach to creating a centered layout that looks good on a wide range of devices and screen sizes.
.week{
           display: flex;
           gap:5px;
           height: 120px;
           padding:20px 40px;
           background: #fff;
           border-radius: 10px ;
       }
The CSS code you provided sets styles for an element with the class name week. Here’s a breakdown of each property:
display: flex;: This sets the display property of theweekelement toflex, which turns the element into a flex container. This allows you to use flexbox layout to control the positioning and sizing of child elements.gap: 5px;: This sets the gap between the child elements of theweekelement to 5 pixels. This property is only available for flex containers and is a shorthand forrow-gapandcolumn-gap.height: 120px;: This sets the height of theweekelement to 120 pixels. This ensures that the element is tall enough to accommodate its child elements and any padding or border that might be added.padding: 20px 40px;: This adds 20 pixels of padding to the top and bottom of theweekelement and 40 pixels of padding to the left and right. Padding is the space between the content of an element and its border, and this property adds space around the child elements of theweekelement.background: #fff;: This sets the background color of theweekelement to white (#fff). This provides a visually appealing background for the child elements of theweekelement.border-radius: 10px;: This adds a border radius of 10 pixels to theweekelement, which rounds the corners of the element. This creates a visually pleasing effect and can help soften the overall look of the element.
Overall, this CSS code sets up a flex container with a white background, a fixed height, and some padding around its child elements. The gap property ensures that there is some space between the child elements, and the border-radius property adds a rounded border to the element for a more visually pleasing effect. This code could be used to create a row of elements, such as days of the week, with a consistent and attractive layout.
.week li{
           list-style: none;
           height: 80px;
           width: 80px;
           display: flex;
           justify-content: center;
           align-items: center;
           color: #666;
           border-radius: 20px;
           font-size: 1.25rem;
       }
his CSS code targets the child li elements within the .week element and sets the following styles:
list-style: none;: This removes the default bullet point style that is applied to unordered list items.height: 80px;: This sets the height of eachlielement to 80 pixels. This property ensures that each day of the week has the same height and fits within the parent.weekcontainer.width: 80px;: This sets the width of eachlielement to 80 pixels. Like theheightproperty, this ensures that each day of the week is the same size.display: flex;: This sets the display property of eachlielement toflex, which allows you to use flexbox layout to control the positioning and sizing of child elements within thelielement.justify-content: center;: This centers the contents of eachlielement horizontally within the element.align-items: center;: This centers the contents of eachlielement vertically within the element.color: #666;: This sets the text color of eachlielement to a dark gray (#666). This provides a visually appealing color for the text within the element.border-radius: 20px;: This adds a border radius of 20 pixels to eachlielement, which rounds the corners of the element. This creates a visually pleasing effect and can help soften the overall look of the element.font-size: 1.25rem;: This sets the font size of the text within eachlielement to 1.25 rem. This ensures that the text is large enough to be easily readable and provides a consistent font size across all days of the week.
Overall, this CSS code sets up a consistent and attractive layout for each day of the week within the .week container. Each day is the same size, has rounded corners, and is centered both horizontally and vertically within the element. The text within each day is a dark gray color and is large enough to be easily readable.
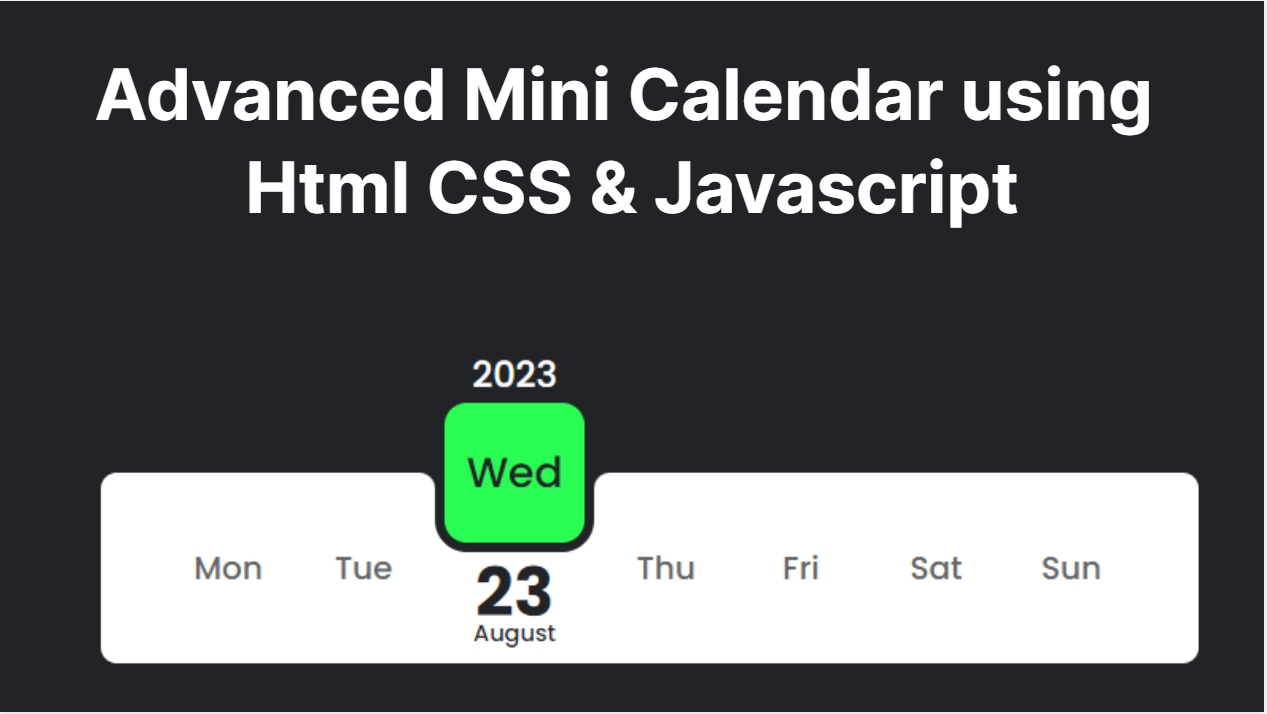
.week li.current{
            position: relative;
            background: #29fd53;
            height: 100px;
            width: 100px;
            font-size: 1.65rem;
            color: #222327;
            border: 6px solid #222327;
            transform: translateY(-70px);
            font-weight: 500;
            cursor: pointer;
        }
This CSS code targets the li element with the current class within the .week container and applies the following styles:
position: relative;: This sets the positioning context for the element torelative. This allows the element to be positioned relative to its original position within the document flow.background: #29fd53;: This sets the background color of the element to a bright green (#29fd53).height: 100px;: This sets the height of the element to 100 pixels. This is larger than the height of the other days of the week, making it stand out as the current day.width: 100px;: This sets the width of the element to 100 pixels, which matches the height to create a square-shaped element.font-size: 1.65rem;: This sets the font size of the text within the element to 1.65 rem, which is larger than the font size of the other days of the week. This increases the visibility and emphasis of the current day.color: #222327;: This sets the color of the text within the element to a dark gray (#222327).border: 6px solid #222327;: This adds a 6-pixel solid border to the element with a dark gray color (#222327).transform: translateY(-70px);: This moves the element 70 pixels up (in the negative y-axis direction) using thetranslateYCSS function. This partially overlaps the element with the previous day, making it more visually distinct from the other days of the week.font-weight: 500;: This sets the font weight of the text within the element to 500, which is a medium weight.cursor: pointer;: This sets the cursor to a pointer, indicating that the element is clickable.
Overall, this CSS code highlights the current day of the week by making it larger, brighter, and more visually distinct from the other days. The text is larger and darker, and the element has a solid border and is partially overlapped with the previous day. This creates a clear visual cue for the current day and makes it easy to find at a glance.
This CSS code targets the ::after pseudo-element of the li element with the current class within the .week container and applies the following styles:
content: '';: This sets the content of the pseudo-element to an empty string. Pseudo-elements need content specified, even if it’s empty, to be displayed.position: absolute;: This sets the positioning context for the pseudo-element toabsolute. This allows the pseudo-element to be positioned relative to its closest positioned ancestor, which in this case is the.week li.currentelement.top: 44px;: This sets the top offset of the pseudo-element to 44 pixels, which positions it vertically halfway between the top and bottom of the.week li.currentelement.right: -36px;: This sets the right offset of the pseudo-element to -36 pixels, which positions it to the right of the.week li.currentelement.width: 30px;: This sets the width of the pseudo-element to 30 pixels.height: 30px;: This sets the height of the pseudo-element to 30 pixels.background: #fff;: This sets the background color of the pseudo-element to white (#fff).border-top-left-radius: 10px;: This sets a border radius of 10 pixels to the top-left corner of the pseudo-element, which creates a rounded corner effect.box-shadow: -6px -6px #222327;: This applies a box shadow to the pseudo-element, which gives it a 3D effect. The-6pxvalue sets the horizontal offset (in the negative x-axis direction), the-6pxvalue sets the vertical offset (in the negative y-axis direction), and the#222327value sets the color of the shadow.
Overall, this CSS code creates a triangular shape to the right of the .week li.current element using a pseudo-element. The pseudo-element has a white background color and a box shadow, which gives it a 3D effect. This adds a visual cue that emphasizes the current day and helps it stand out even more.
.week li.current h1{
position: absolute;
transform: translateY(76px);
font-size: 1.6em;
color: #222327;
}
his CSS rule targets the h1 element inside the .week li.current element and sets its position to be absolute, which means it is positioned relative to its nearest positioned ancestor (in this case, the .week li.current element) instead of the normal flow of the document.
The transform property is used to move the h1 element downwards by 76 pixels from its original position. This is done to position the text below the li element, which has been transformed to a larger size using the previous CSS rules.
The font-size property sets the size of the text to 1.6em, which is 1.6 times the size of the font used in the document (in this case, the ‘Poppins’ font imported from Google Fonts).
The color property sets the color of the text to a dark shade of gray (#222327) that contrasts well with the light green background of the current day.
.week li.current h5{
position: absolute;
transform: translateY(102px);
font-size: 0.55em;
color: #222327;
font-weight: 500;
}
This CSS rule targets the h5 element inside the .week li.current element and sets its position to be absolute, which means it is positioned relative to its nearest positioned ancestor (in this case, the .week li.current element) instead of the normal flow of the document.
The transform property is used to move the h5 element downwards by 102 pixels from its original position. This is done to position the text below the h1 element, which has been moved downwards by 76 pixels using the previous CSS rule.
The font-size property sets the size of the text to 0.55em, which is 0.55 times the size of the font used in the document (in this case, the ‘Poppins’ font imported from Google Fonts).
The color property sets the color of the text to a dark shade of gray (#222327) that contrasts well with the light green background of the current day.
The font-weight property sets the weight of the font to 500, which is a medium weight that makes the text stand out more.
.week li.current h3{
position: absolute;
transform: translateY(-62px);
font-size: 0.85em;
color: #fff;
font-weight: 500;
}
This CSS rule targets the h3 element inside the .week li.current element and sets its position to be absolute, which means it is positioned relative to its nearest positioned ancestor (in this case, the .week li.current element) instead of the normal flow of the document.
The transform property is used to move the h3 element upwards by 62 pixels from its original position. This is done to position the text above the current day indicator, which has been moved downwards using the previous CSS rules.
The font-size property sets the size of the text to 0.85em, which is 0.85 times the size of the font used in the document (in this case, the ‘Poppins’ font imported from Google Fonts).
The color property sets the color of the text to white (#fff), which contrasts well with the dark green background of the current day.
The font-weight property sets the weight of the font to 500, which is a medium weight that makes the text stand out more.
Finally our css file look like as follows
*{
margin: 0;
padding: 0;
box-sizing: border-box;
font-family: 'Poppins', sans-serif;
}
body{
display: flex;
justify-content: center;
align-items: center;
min-height: 100vh;
background: #222327;
}
.week{
display: flex;
gap:5px;
height: 120px;
padding:20px 40px;
background: #fff;
border-radius: 10px ;
}
.week li{
list-style: none;
height: 80px;
width: 80px;
display: flex;
justify-content: center;
align-items: center;
color: #666;
border-radius: 20px;
font-size: 1.25rem;
}
.week li.current{
position: relative;
background: #29fd53;
height: 100px;
width: 100px;
font-size: 1.65rem;
color: #222327;
border: 6px solid #222327;
transform: translateY(-70px);
font-weight: 500;
cursor: pointer;
}
.week li.current::before{
            content: '';
            position: absolute;
            top:44px;
            left:-36px;
            width: 30px;
            height: 30px;
            background: #fff;
            border-top-right-radius: 10px;
            box-shadow: 6px -6px #222327;
        }
.week li.current::after{
            content: '';
            position: absolute;
            top:44px;
            right:-36px;
            width: 30px;
            height: 30px;
            background: #fff;
            border-top-left-radius: 10px;
            box-shadow: -6px -6px #222327;
        }
.week li.current h1{
            position: absolute;
            transform: translateY(76px);
            font-size: 1.6em;
            color: #222327;
        }
.week li.current h5{
            position: absolute;
            transform: translateY(102px);
            font-size: 0.55em;
            color: #222327;
            font-weight: 500;
        }
.week li.current h3{
            position: absolute;
            transform: translateY(-62px);
            font-size: 0.85em;
            color: #fff;
            font-weight: 500;
        }
Now open javascript file and add js code as follows
let months = ["January","February","March","April","May","June","July","August","September","October","November","December"];
This is a JavaScript array that contains the names of the twelve months of the year as strings. Each month name is separated by a comma and enclosed in quotes to indicate that it is a string value.
The array is assigned to a variable called months using the let keyword, which allows the variable to be re-assigned later if necessary.
This array can be used in a JavaScript program to dynamically display the name of the current month or any other month as needed. For example, you could use the Date object in JavaScript to get the current month number (0 for January, 1 for February, etc.) and then use that number to access the corresponding month name from the months array.
let date = new Date("August 23, 2023 01:15:00");
This is a JavaScript statement that creates a new Date object and assigns it to a variable called date.
The Date object represents a specific moment in time and can be created in several ways. In this case, the date is specified as a string “August 23, 2023 01:15:00”, which follows a format that the Date constructor can parse.
The string represents a specific date and time: August 23, 2023 at 1:15 AM and 0 seconds. This means that the Date object created by this statement represents that exact moment in time.
Once the Date object is created, you can use various methods of the Date object to access different aspects of the date and time, such as the month, day, year, hours, minutes, and seconds. These methods can be useful for displaying the date and time in a particular format or for performing calculations with dates and times.
let dayNum = date.getDay();
    let day = date.getDate();
    let month = months[date.getMonth()];
    let year = date.getFullYear();
This code takes the date object we created earlier and extracts various properties from it using built-in JavaScript functions:
getDay()returns the day of the week as a number (0 for Sunday, 1 for Monday, and so on).getDate()returns the day of the month as a number.getMonth()returns the month as a number (0 for January, 1 for February, and so on).getFullYear()returns the year as a four-digit number.
These values are then assigned to variables:
dayNumstores the day of the week as a number.daystores the day of the month as a number.monthstores the month as a string.yearstores the year as a four-digit number.
let active = document.querySelector(".week li:nth-child("+dayNum+")");
This code selects the list item (li) element corresponding to the current day of the week and assigns it to the variable active. The querySelector method is used to select the nth-child element of the parent element with the class of “week”, where n is the day of the week represented by dayNum. For example, if dayNum is 3, then the 3rd child element (corresponding to Wednesday) of the parent element with the class of “week” will be selected and assigned to the active variable.
active.classList.add('current');
This code adds the class “current” to the list item (li) element selected in the previous line and assigned to the active variable. The classList property of the active element is used to add the “current” class. Once the “current” class is added, the element will display with the styles defined for that class, including the larger size, background color, and positioning defined in the CSS.
let h1 = document.createElement('h1');
    h1.innerHTML = day;
    active.appendChild(h1);
This code creates a new h1 element using the document.createElement method, sets its innerHTML to the value of the day variable, and then appends it as a child of the active element (which was previously defined as the list item corresponding to the current day of the week). This will add the h1 element as a child of the active list item, and the innerHTML of the h1 element will be the value of day. Once this code is executed, the h1 element will be visible within the active list item, displaying the current day number.
let h5 = document.createElement('h5');
  h5.innerHTML = month;
  active.appendChild(h5);
This code creates a new h5 element using the createElement() method and assigns it to the h5 variable. It then sets the innerHTML property of the h5 element to the value of the month variable. Finally, it appends the h5 element as a child of the active element, which is the li element representing the current day of the week.
This will display the month name inside the active element, which is the current day of the week, on the web page.
let h3 = document.createElement('h3');
    h3.innerHTML = year;
    active.appendChild(h3);
These lines of code create a new HTML heading element (<h3>), set its inner HTML to the year value that was previously calculated, and then appends this new heading element as a child of the active list item element that represents the current day in the calendar.
The resulting HTML markup will have a <h3> element inside the current day’s <li> element, displaying the year value in the calendar.
Finally our js file is as follows
let months = ["January","February","March","April","May","June","July","August","September","October","November","December"];
    let date = new Date("August 23, 2023 01:15:00");
    let dayNum = date.getDay();
    let day = date.getDate();
    let month = months[date.getMonth()];
    let year = date.getFullYear();


    let active = document.querySelector(".week li:nth-child("+dayNum+")");

    active.classList.add('current');

    let h1 = document.createElement('h1');
    h1.innerHTML = day;
    active.appendChild(h1);

    let h5 = document.createElement('h5');
    h5.innerHTML = month;
    active.appendChild(h5);

    let h3 = document.createElement('h3');
    h3.innerHTML = year;
    active.appendChild(h3);